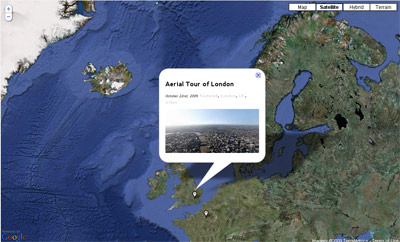
Geomashup 1.2 – Dynamic Google map to display all your posts
Right here is a great tutorial for all you wordpress bloggers out there. Now you can show all your posts on 1 giant Google map, and display 1 post at a time and the location.
See it in action on our new map page
In thinking about the design we decided it would be nice to showcase there images/virtual tours on one big map, with a timer and loop set on the infowindows to show a post/image for 10 seconds and then display another post/image and present the locations in an attractive way on a Google map.
After a bit of research on the various mashup sites out there, we were pleased to find a plugin that did half the job. Geomashup a plugin created by Dylan Kuhn allows you to geolocate your posts and show them all on 1 big map. It comes with a great range of options like assigning different markers to your catergories.
The plugin however did not create the dynamic map we wanted so a bit of modding was needed. After a few posts on various forums we were delighted to gain the assistance of Google map maestro’s Mike Williams and Dylan Kuhn, who both helped develop our code and made our idea come true.
So…. first of download Geomashup – once installed, you will be prompted to visit the Google maps api site to obtain your unique key. Enter this in the correct field on the Geomashup options page now found in your wordpress admin. Make any settings here you like, the map we will be using is the ‘global map’.
Next copy the custom-sample.js and rename to custom.js, you can also copy example-map-style.css and rename it map-style.css and geo-mashup-info-window.php if you would like more control over the styling of your infowindows. Open your custom.js file and place the following code anywhere in the file…
function customizeGeoMashupMap( properties, map ) {

        var counter=0,

          cancel=false,

             infowindow = map.getInfoWindow(),

                loopMap = function() {

                        if (++counter >= properties.post_data.posts.length) counter = 0;

                        GeoMashup.clickMarker( properties.post_data.posts[counter].post_id );

                     if ( ! cancel ) {

                                setTimeout(function() { loopMap(); },10000)

                        }

                };

        // If we don't have a request to open a post, start the tour

        if ( ! properties.open_post_id ) {

                setTimeout(function() { loopMap(); },10000)

        }

        // Center info windows when opened

        google.maps.Event.addListener( map, 'infowindowopen', function() {

                map.panTo( infowindow.getPoint() );

        } );

        // Cancel the tour if the info window is manually closed

        google.maps.Event.addListener( infowindow, 'closeclick', function() {

                cancel = true;

        } );

   loopMap();

}
Upload the custom.js file to your plugins/geomashup directory and the map-style.css and geo-mashup-info-window.php to your theme directory.
Next you need to edit some of your posts. At the bottom of the post edit screen, you’ll find a map. Geolocate where the post/image was made, you can either search using names or just type in the lat and long coord’s. Update your post and do the same on another, so you have at least 2 posts geolocated.
Next place the shortcode for the main map on your map page, which you will also need to assign in the geomashup settings.
And thats it 🙂
View your map page and you should have an infowindow appear on the map showing an excerpt from your post for 10 seconds, it should then close and another infowindow will appear in the place where you have located it on the map. You can change the time it take to display by whatever you like by editing where it says 10000 in the code.
Geolocate all your posts and you then have a great way to show of your blog or photogallery. If you would like thumbnail images to appear in the infowindow remember to place the thumbnail in the excerpt box on the post editing page (this will not appear in the main post).
For the wildlife photography site we are going to combine it with yapb (yet and photoblog) plugin, and use different markers for species of animals, the map will be a great way to show where the wildlife images were taken. We will post it when finished, until then check this example we made on the toursfromabove website.
We would like to do this with all our 360 panoramas on this blog but I think its gonna take a little while as we have well over 250 posts to locate 😛
If you end up using this code, let us know we’d love to see it in action. You can find all the docs and information you need on the Geomashup Google code pages and if you enjoy that be sure to check Mike Williams Google Maps API Tutorial’s it is a fantastic resource.


